
Setup a basic managed Kafka (message queue) on AWS: MSK
Today, I will:
- Setup an AWS MSK (Managed Streaming for Kafka) cluster. In less than 30 minutes
Now, setting up a production ready Kafka cluster, involves things like monitoring, alerting, logs, fault tolerance, high availability, security, etc require a lot more investment. What you’re going to see here is for learning purposes !
Having said that, the first step is always the machines and the services
Prerequisites
- An active AWS account: Make sure to check my previous video/post where I setup a brand new AWS account and configure IAM <> tf.
I will be using this repo to run my challenges, so you’ll find all the challenges code there.
Overview
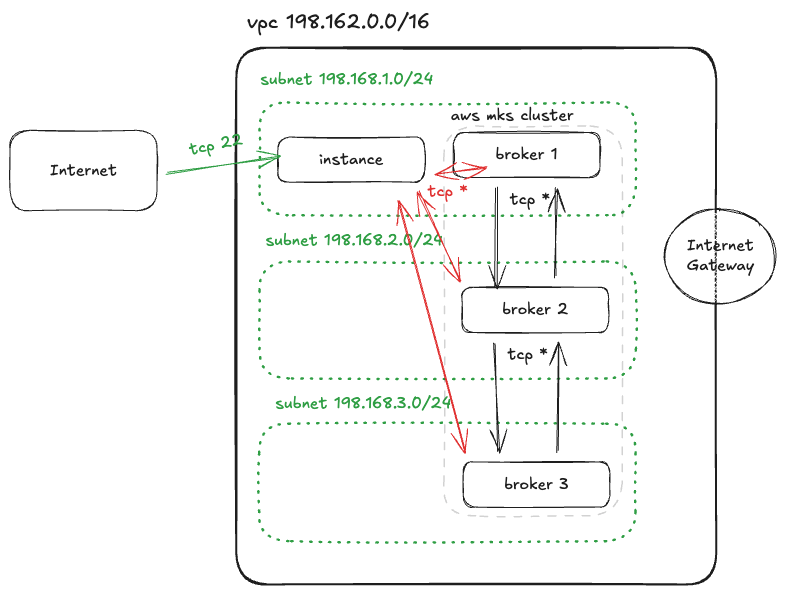
For this one, Here’s the list and a a diagram of what we will need to consider.
1. VPC
  - Subnets
  - Security groups
    - Internet <> Instance
    - Instance <> Cluster
    - Cluster <> Cluster
  - Internet Gateway
  - Route Table
2. IAM
  - Role
  - Policy
3. EC2 Instance
  - Ubuntu 22.04
  - SSH Key
  - Kafka tools preinstalled
4. MSK Cluster
So in essence we will deploy a Kafka cluster on three different subnets (private) and then interact with the cluster using an instance in a public subnet, reacheable only through port 22 (ssh). The idea is to jump into this machine, ping the cluster, and then stream a message into the cluster
Setup the network resources
A cloud VPC (with its sub resources such as the Internet Gateway, Route Table, Subnets etc) is something that you usually and likely will have do only a couple times (when creating an environment from scratch for example). This use case is perfect for us to use modules.
I have in the past, used this one terraform-aws-vpc which is absolutely fantastic and very welll mantained, however, the purpose of this excercise is to use resources as much as possible to avoid hidding the cloud’s quirks under any abstraction. More on the philosophy of instantinfra
First let’s create some some variables
# variables.tf
vpc_cidr_block = 198.162.0.0/16
Then will proceed to create a VPC, a couple of subnets, the security groups and the rest of the resources.
# vpc.tf

resource "aws_vpc" "vpc" {
  cidr_block = var.vpc_cidr_block
}

resource "aws_internet_gateway" "ig" {
  vpc_id = aws_vpc.vpc.id
}

resource "aws_route_table" "rt" {
  vpc_id = aws_vpc.vpc.id

  route {
    cidr_block = "0.0.0.0/0"
    gateway_id = aws_internet_gateway.ig.id
  }
}

# Get the avaliablity zones (3) of the region. AWS has 3 per region
# https://docs.aws.amazon.com/global-infrastructure/latest/regions/aws-availability-zones.html
data "aws_availability_zones" "this" {
  state = "available"
}


resouce "aws_subnet" "subnets" {
  count = 3
  vpc_id = aws_vpc.vpc.id
  cidr_block = "198.168.${count.index + 1}.0/24" # 254 hosts
  availability_zone       = data.aws_availability_zones.available.names[count.index]
  map_public_ip_on_launch = true
}

resource "aws_route_table_association" "rta" {
  count          = 3
  subnet_id      = aws_subnet.subnets[count.index].id
  route_table_id = aws_route_table.rt.id
}


resource "aws_security_group" "msk" {
  name_prefix = "${var.prefix}-msk"
  vpc_id = aws_vpc.vpc.id

  egress {
    from_port = 0
    to_port = 0
    protocol = -1
    cidr_blocks = ["0.0.0.0/0"]
  }
}

resource "aws_security_group" "ec2" {
  name_prefix = "${var.prefix}-ec2"
  vpc_id = aws_vpc.vpc.id

  ingress {
    from_port = 22
    to_port = 22
    protocol = "tcp"
    cidr_blocks = ["0.0.0.0/0"]
  }

  egress {
    from_port = 0
    to_port = 0
    protocol = -1
    cidr_blocks = ["0.0.0.0/0"]
  }
}

resource "aws_security_group_rule" "msk_ec2" {
  type                     = "ingress"
  from_port                = 0
  to_port                  = 0
  protocol                 = "-1"
  source_security_group_id = aws_security_group.ec2.id
  security_group_id        = aws_security_group.msk.id
}

resource "aws_security_group_rule" "ec2_msk" {
  type                     = "ingress"
  from_port                = 0
  to_port                  = 0
  protocol                 = "-1"
  source_security_group_id = aws_security_group.msk.id
  security_group_id        = aws_security_group.ec2.id
}
Setup the IAM resources
Next, we will create the IAM role and policy that we’ll need to allow our instances to access the cluster
# ec2 assume role
resource "aws_iam_role" "r" {
  name = "${var.prefix}-iam-role"
  assume_role_policy = jsonencode({
    Version = "2012-10-17"
    Statement = [
      {
        Action = "sts:AssumeRole"
        Effect = "Allow"
        Principal = {
          Service = "ec2.amazonaws.com"
        }
      }
    ]
  })
}


# grant all perms to ec2 instance on the kafka cluster
# https://docs.aws.amazon.com/msk/latest/developerguide/mkc-iam-policy-examples.html
resource "aws_iam_policy" "p" {
  {
    "Version": "2012-10-17",
    "Statement": [
      {
        "Effect": "Allow",
        "Action": [
          "kafka-cluster:*"
        ],
        "Resource": [
          "*"
        ]
      }
    ]
  }
}

resource "aws_iam_role_policy_attachment" "iam_rpa" {
  role = aws_iam_role.r.name
  policy = aws_iam_policy.p.name
}

resource "aws_iam_instance_profile" "ip" {
  name = "${var.prefix}-instance-profile"
  role = aws_iam_role.r.name
}
Setup the compute resources
Once that is complete we can proceed to create the EC2 instance with Ubuntu 22.04 that will serve as our “test” or “jump” machine to interact with the cluster. We will need an SSH key too !
# Get the Ubuntu 22.04 instance
# https://registry.terraform.io/providers/hashicorp/aws/latest/docs/data-sources/ami_ids
data "aws_ami" "ubuntu" {
  most_recent = true

  filter {
    name   = "name"
    values = ["ubuntu/images/hvm-ssd/ubuntu-*-22.04-amd64-*-*"]
  }

  owners = ["099720109477"]  # Canonical owner ID for Ubuntu AMIs
}


# Create key
ssh-keygen -t ed25519 -C "hey@instant-infra.com" -f ~/.ssh/008

cat ~/.ssh/008.pub | pbcopy

resource "aws_key_pair" "key" {
  key_name   = "${var.prefix}-key"
  public_key = "<PASTE>"
}

# Create EC2

resource "aws_instance" "test" {
  ami           = data.aws_ami.ubuntu.id
  instance_type = "t3.micro"

  iam_instance_profile = aws_iam_instance_profile.ip.name
  key_name = aws_key_pair.key.name

  subnet_id = aws_subnet.subnets[0].id
  vpc_security_group_ids = [aws_security_group.ec2.id]

  # https://dev.to/aws-builders/aws-msk-iam-authentication-cli-commands-4il4
  user_data = << EOF

#!/bin/bash

# Variables
KAFKA_VERSION=3.8.1
BINARY_VERSION=2.13
IAM_AUTH_CLI_VERSION=2.2.0
KAFKA_ROOT=$HOME/kafka_$BINARY_VERSION-$KAFKA_VERSION
CLASSPATH=$KAFKA_ROOT/libs/aws-msk-iam-auth-${IAM_AUTH_CLI_VERSION}-all.jar


# Upgrade and add Java 11
sudo apt-get update -y
sudo apt-get updgrade -y
sudo apt-get install openjdk-11-jdk -y

# Download Kafka Binary
wget https://archive.apache.org/dist/kafka/$KAFKA_VERSION/kafka_$BINARY_VERSION-$KAFKA_VERSION.tgz
tar -zxvf kafka_$BINARY_VERSION-$KAFKA_VERSION.tgz


cd kafka_$BINARY_VERSION-$KAFKA_VERSION
cd $KAFKA_ROOT/libs/

# Download AWS MSK IAM CLI
wget https://github.com/aws/aws-msk-iam-auth/releases/download/v$IAM_AUTH_CLI_VERSION/aws-msk-iam-auth-$IAM_AUTH_CLI_VERSION-all.jar
cd $KAFKA_ROOT/config

# AWS IAM Auth file
# https://github.com/aws/aws-msk-iam-auth
cat <<EOF> client.properties
security.protocol=SASL_SSL
sasl.mechanism=AWS_MSK_IAM
sasl.jaas.config=software.amazon.msk.auth.iam.IAMLoginModule required;
sasl.client.callback.handler.class=software.amazon.msk.auth.iam.IAMClientCallbackHandler
EOF

}
Finally, the AWS MSK cluster. This one will host the kafka brokers .
resource "aws_msk_cluster" "msk" {
  cluster_name = "${var.prefix}-msk"
  # https://docs.aws.amazon.com/msk/latest/developerguide/supported-kafka-versions.html
  kafka_version = "3.8.x"
  number_of_broker_nodes = 3

  broker_node_group_info {
    instance_type = "kafka.t3.small"
    client_subnets = aws_subnet.subnets[*].id
    security_groups = [aws_security_group.msk.id]
    storage_info {
      ebs_storage_info {
        volume_size = 10
      }
    }
  }

  client_authentication {
    # simple authentication and security layer
    sasl {
      iam = true
    }
    unauthenticated = true
  }

  encryption_info {
    encryption_in_transit {
      client_broker = TLS_PLAINTEXT
    }
  }
}
Define outputs
# outputs.tf

output "brokers" {
  value = aws_mks_cluster.bootstrap_brokers_sasl_iam
}

output "instance_ip" {
  value = aws_instance.test.public_ip
}
Lets put everything together and apply.
tf init
tf apply
Once everything is provisioned, we’ll need
- Brokers Endpoints (Connection string)
- Test instance public IP
BROKERS_ENDPOINT=$(tf output -raw brokers)
echo "${BROKERS_ENDPOINT}" | tee | pbcopy
Test it out
Lets connect to the machine
ssh -i ~/.ssh/008 ubuntu@$(tf output -raw instance_ip)
Create a topic and start a producer
KAFKA_VERSION=3.8.1
BINARY_VERSION=2.13
KAFKA_ROOT=$HOME/kafka_$BINARY_VERSION-$KAFKA_VERSION
CLIENT_PROPERTIES=$KAFKA_ROOT/config/client.properties

BROKERS_ENDPOINT=<COPY FROM THE OUTPUT OF TF>
TOPIC=instantinfra

cd kafka_$BINARY_VERSION-$KAFKA_VERSION

# create topic
bin/kafka-topics.sh --create --bootstrap-server "${BROKERS_ENDPOINT}" --command-config "${CLIENT_PROPERTIES}" --replication-factor 3 --partitions 1 --topic "${TOPIC}"

# produce sequential numbers
for i in $(seq 1 1000); do
  echo $i | bin/kafka-console-producer.sh --broker-list "${BROKERS_ENDPOINT}" --producer.config "${CLIENT_PROPERTIES}" --topic "${TOPIC}"
done

# in another terminal
bin/kafka-console-consumer.sh --bootstrap-server "${BROKERS_ENDPOINT}" \
  --consumer.config "${CLIENT_PROPERTIES}" --topic "${TOPIC}" --from-beginning
You should see the sequential numbers being consumed as if they where streaming messages
Don’t forget to cleanup
tf destroy
Reference
https://docs.aws.amazon.com/msk/latest/developerguide/getting-started.html
https://docs.aws.amazon.com/msk/latest/developerguide/create-client-iam-role.html
https://dev.to/aws-builders/automate-your-aws-msk-kafka-cluster-with-terraform-a-complete-guide-18li